Captain277 (talk | contribs) No edit summary |
Captain277 (talk | contribs) No edit summary |
||
| Line 1: | Line 1: | ||
==The Engine Room== | ==The Engine Room== | ||
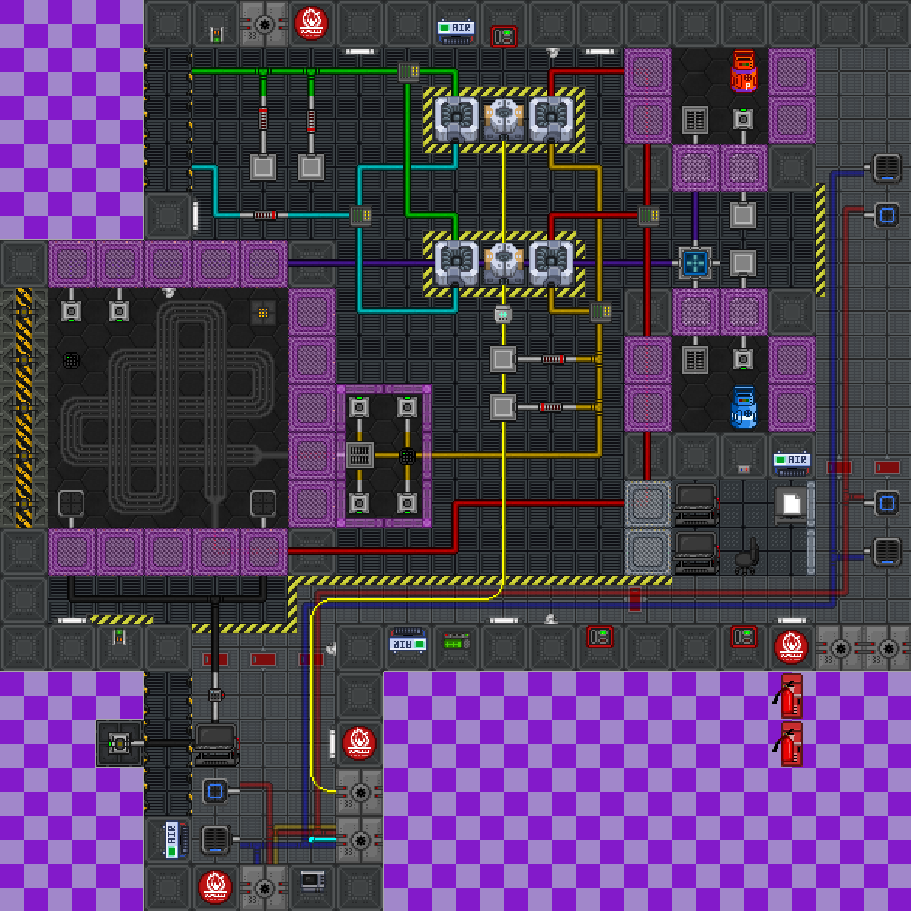
[[File: | [[File:BurnChamberMap.png|The mapped engine room|thumb]]The Engine room consists of: | ||
# Engine chamber. The interior is 5x5, framed with heat resistant glass and lead walls. | # Engine chamber. The interior is 5x5, framed with heat resistant glass and lead walls. | ||
# A fuel rod bay housing an assortment of reflectors and radioactive fuel rods. | # A fuel rod bay housing an assortment of reflectors and radioactive fuel rods. | ||
Revision as of 03:00, 3 May 2022
The Engine Room
The Engine room consists of:
- Engine chamber. The interior is 5x5, framed with heat resistant glass and lead walls.
- A fuel rod bay housing an assortment of reflectors and radioactive fuel rods.
- A dual TEG setup, already hooked up to the loops.
- Four radiation collectors arranged around the reactor.
- A side area where phoron tanks and a dedicated phoron canister are stored.
- An emergency freezer linked to the Engine chamber.
- Vacuum Radiator connections, where gases in the cold loop are cooled.
Engine Intent
As a TEG-based engine, the Burn Chamber relies on the heating and cooling of gas to spin turbines. Cold Loop gas is piped along a circuitous route - typically through space - to allow it to bleed off heat and grow colder. In contrast, Hot Loop gas is fed into the pipe loop inside the burn chamber. Although visually dramatic, the burning gas in the Chamber is not, in fact, what fills the hot loop. Instead, the continuous blaze in the chamber heats the gas contained within the Hot Loop through the insulated pipes.
Basic Set-Up
This is a baseline guide to make sure the shift doesn't go without power, and the engine doesn't explode. Any Engineer that knows their way around Engineering mechanics will tell you that this setup is suboptimal. It is important that the no hazard steps are finished before any other steps are completed.
No Hazard:
- Put four cans of Phoron into the Cold Loop.
- Put two cans of Phoron into the Hot loop.
- Fill four phoron tanks up at the phoron canister.
Atmospheric Hazard:
- Lift the Blast Shutters on the Core.
- Wrench the Fusion Core Down.
- Link the Fusion Core to a multitool.
- Secure the Radiation Collectors.
- Place the filled phoron tanks into the collectors.
Radiation Hazard:
- Retrieve a fuel rod case and a reflector case from storage.
- Load three fuel rods into the reactor core.
- Load four reflector rods into the reactor core.
- Manually set the insertion of all reflector rods to 100%.
- Manually set the insertion of all fuel rods to 50%. Warning: Monitor temperature of rods and adjust insertion accordingly. This varies per fuel type. Ensure proper heat management.
- Close the blast doors.
Engine set!
Finalizing Touches
- Max Input and Output on the Main SMES in the SMES room.
- Use the multitool from step 6 to link the core to the computer in the control room.
