Captain277 (talk | contribs) (Created page with "This page exists to help familiarize new Game Admins and Event Managers with the basic tools used in day to day tasks. Questions of policy or procedure may be answered here ...") |
Captain277 (talk | contribs) No edit summary |
||
| Line 74: | Line 74: | ||
==Player Panel== | ==Player Panel== | ||
[[File:Playerpanel.png]] | |||
Accessed by typing the verb 'player-panel', or by clicking the relevant button in the Admin tab. | Accessed by typing the verb 'player-panel', or by clicking the relevant button in the Admin tab. | ||
Contains a list of players currently in-game. This system is primarily useful for finding players. Notably, it has very similar commands to the Ahelp buttons. Two of these, ''PP'' and ''N'', will be explained further here. | Contains a list of players currently in-game. This system is primarily useful for finding players. Notably, it has very similar commands to the Ahelp buttons. Two of these, ''PP'' and ''N'', will be explained further here. | ||
===Individual Player Panel=== | ===Individual Player Panel=== | ||
[[File:Playerpanel2.png]] | |||
Accessed via the ''PP'' button found in certain Admin interfaces, such as ahelps, or by right clicking a mob and selecting 'Show Player Panel'. | Accessed via the ''PP'' button found in certain Admin interfaces, such as ahelps, or by right clicking a mob and selecting 'Show Player Panel'. | ||
Somewhat confusingly named, the Player Panel is the direct interaction panel for an individual player. It provides you with a lot of necessary information, such as Ckey and player age. It functions as a hub for most quick-interact buttons an Admin may need to use on a player. From this panel, a player's genomes may be checked, as can their known languages. An Admin may add or remove languages from a player through the table at the bottom of the page. Administrative actions will most easily be carried out through this panel as well, as the options to Aheal (Heal), check Notes, or Ban a player may all be accessed from this menu. | Somewhat confusingly named, the Player Panel is the direct interaction panel for an individual player. It provides you with a lot of necessary information, such as Ckey and player age. It functions as a hub for most quick-interact buttons an Admin may need to use on a player. From this panel, a player's genomes may be checked, as can their known languages. An Admin may add or remove languages from a player through the table at the bottom of the page. Administrative actions will most easily be carried out through this panel as well, as the options to Aheal (Heal), check Notes, or Ban a player may all be accessed from this menu. | ||
| Line 93: | Line 93: | ||
==View Variables== | ==View Variables== | ||
[[File:VV.png]] | |||
Accessed by right clicking an item and selecting 'View Variables', or through the '''VV''' button. | Accessed by right clicking an item and selecting 'View Variables', or through the '''VV''' button. | ||
Variables dictate virtually everything in the game. This powerful command allows you to change core aspects of the subject item or mob. It is entirely possible to damage the entire game for the duration of the round - ex. ''deleting the blood reagent completely'' - if you make mistakes in this panel. Due to this, be sure you know what you're doing before you do it, and if you have '''any''' questions, make sure you ask someone who might know. The VV panel has a drop-down menu for some quick edit choices, and it also has an integrated search bar to help you find relevant variables. | Variables dictate virtually everything in the game. This powerful command allows you to change core aspects of the subject item or mob. It is entirely possible to damage the entire game for the duration of the round - ex. ''deleting the blood reagent completely'' - if you make mistakes in this panel. Due to this, be sure you know what you're doing before you do it, and if you have '''any''' questions, make sure you ask someone who might know. The VV panel has a drop-down menu for some quick edit choices, and it also has an integrated search bar to help you find relevant variables. | ||
== Traitor panel == | == Traitor panel == | ||
[[File:Traitorpanel.png]] | |||
Accessed by right clicking a mob and selecting 'Show Traitor Panel'. | Accessed by right clicking a mob and selecting 'Show Traitor Panel'. | ||
Contains the options to make someone an antagonist and specialize their role (objectives, equipment, memory, etc.). | Contains the options to make someone an antagonist and specialize their role (objectives, equipment, memory, etc.). | ||
Revision as of 01:44, 17 October 2021
This page exists to help familiarize new Game Admins and Event Managers with the basic tools used in day to day tasks. Questions of policy or procedure may be answered here Policy: Administration, or by another member of the staff team. This list is not exhaustive, and may be subject to change.
Adminhelps (Ahelps) and Prayer
A player will generally adminhelp (hereafter "ahelp") when they require direct administrative assistance. Ahelps are considered OOC, and will generally be related to bugs, griefers, or mechanical inquiries. It is an admin's responsibility to respond to ahelps to the best of their ability. Prayers are considered IC, and are ways for the player's character to petition 'gods' or higher powers for some manner of favor. Unlike with ahelps, you are not obligated to respond to prayers.
- Click on the username to send them a PM
- Click on the ? to see a short summary about the player.
- PP = Player Panel
- VV = View Variables
- SM = Subtle Message
- FLW = Orbit that player (Aghosts you before jumping.)
- TP = Traitor Panel
- REJT = Reject the ticket. (Usually used on joke or spam ahelps.)
- IC = Closes the ticket and marks it IC. (Used to tell the player that their ahelp is considered an IC issue.)
- CLOSE = Closes the ticket.
- RSLVE = Closes the ticket and marks it Resolved.
- HANDLE = Alerts other Administrators that you're handling the ticket.
- General Buttons = These buttons are shared with Ahelps, and are outlined there.
- JMP = Identical to the FLW button on an Ahelp.
- CA = Check Antagonist (Tells you if the player is an antagonist.)
- SC = Spawn Cookie (Drops a cookie at the player's feet. Generally a way to politely reject a prayer, but show it was heard.)
- ST = Spawn Treat (As above.)
- SMITE = Shows a list of IC punishments to inflict, such as striking the character with lightning, or dislocating all of their limbs. Generally a less polite way to reject prayers.
Secrets
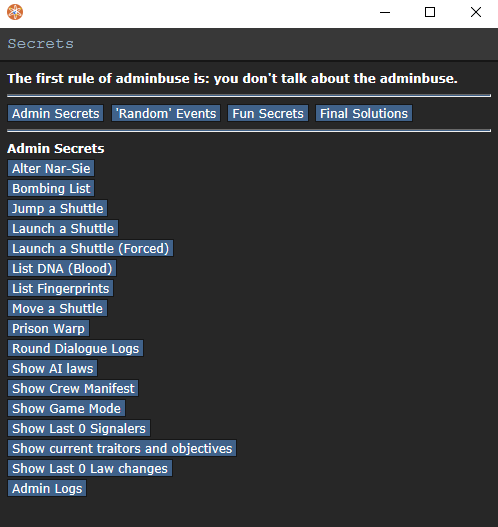
Accessed by typing the verb 'secrets', or by clicking the relevant button in the Admin tab of the UI.
This panel exists to provide the Admin or EM with a variety of on the fly administrative tools. It is divided into four categories: "Admin Secrets", "'Random' Events", "Fun Secrets", and "Final Solutions". Each of these categories has its own list of commands related to that general listing.
- Admin Secrets = General utility commands, such as forcing shuttle movement, log checks, and tracking current traitors/AI laws and changes, etc. are covered here.
- 'Random' Events = Currently small, this list of events exists to spice up rounds, but is markedly inferior to the Event Manager Panel.
- Fun Secrets = Everything from breaking all the station's lights, to taking off everyone's clothes. The prime breeding ground of 'Buse, be mindful of what you choose to do here.
- Final Solutions = It's recommended that you don't touch anything in here. You will get in trouble.
Always remember, any buttons you click in the Secrets panel are saved to the Admin Log. So don't abuse your power, or you will be found out!
Event Manager Panel
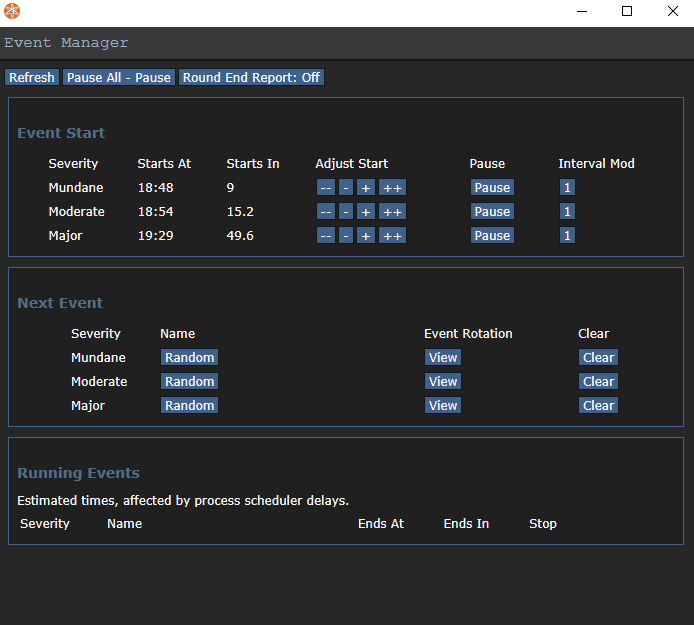
Accessed by typing the verb 'event-manager-panel', or by clicking the relevant button in the Admin tab of the UI.
The name of this panel is a bit of a misnomer, and predates the creation of the current "Event Manager" staff role. This panel interfaces with the game's built-in events management system. Events are divided into three different severity pools: "Mundane", "Moderate", and "Severe". Each pool has a different time weight, which determines when the next event of that severity will be randomly selected from its respective pool. Admins may manually queue up events through the Next Event section of the panel, and may also decrease or increase the time between events by interacting with the Plus and Minus keys on each side of the respective Event's timer.
- Mundane = Events that are generally unlikely to disrupt the flow of station life, from an electrical storm to a minor vermin infestation.
- Moderate = Events that are likely to disrupt operations for a percentage of the station's population, such as solar grub infestations or communications blackouts.
- Severe = Events that pose a serious threat to both the operations of the vessel and the crew itself, such as space vines, meteor waves, or hostile boarders.
As with the Secrets panel, your interactions with the Event Manager Panel are logged and may be viewed by other Staff.
Build Mode
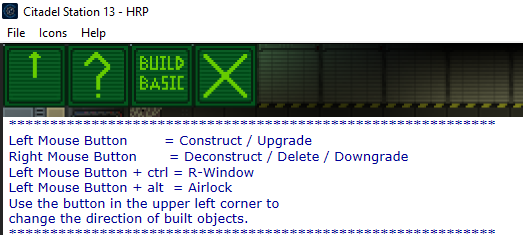
Accessed by typing the verb 'toggle-build-mode-self', or by clicking the relevant button in the Special Verbs tab of the UI.
Buildmode is a powerful in-game editor that outstrips the Game Panel in almost every way. Buildmode is complex enough to warrant its own wiki article, so this will cover the basics of the interface. This tool exists to assist Admins and Event Managers in rapidly constructing maps, POIs, etc for player interaction. It is also capable of quickly spawning items and mobs on demand, and features several utility modes which will be briefly discussed below.
- Basic Buildmode = Basic Buildmode is exactly what it says on the tin. This level allows you to quickly place basic steel walls and turfs, and upgrade them with repeated clicks. Unlike Advanced Buildmode, right clicking in Basic will allow you to delete turfs and spawn open space.
- "Advanced Buildmode' = Functionally superior to Basic Buildmode, right clicking the Buildmode Adv button will open a dialogue box through which you can entire full or partial item paths to quickly select turfs, mobs, items, etc. and spawn them wherever you left click.
- Edit = This command allows you to Varedit items by clicking on them. Simply right click the Edit command to open a dialogue box which will request the relevant var, input type, and input that you wish to change. You may then left click an item to enforce that varedit. This is useful for mass renaming, or quickly altering descriptions on items, etc.
- Throw = When this mode is selected, right click an item to 'grab' it, and left click a tile to throw the object there.
- Turf = This mode allows you to rapidly place turfs using a grid pattern.
- Ladder = In this mode you may place the up or down portion of a ladder, and link it to another.
- Move Into = This command appears to affect Vore in some way, and may presumably be used to force a mob into another mob.
- Lighting = Right clicking this command opens a dialogue box asking you to define a wide array of lighting-based effects. Once defined, that effect will appear wherever you left click. The effect may be removed by right clicking that same area.
- AI = This mode allows you to edit the behavior of selected simplemob AI. You may tether simplemobs to follow other mobs, react aggressively, patrol areas, etc.
Player Panel
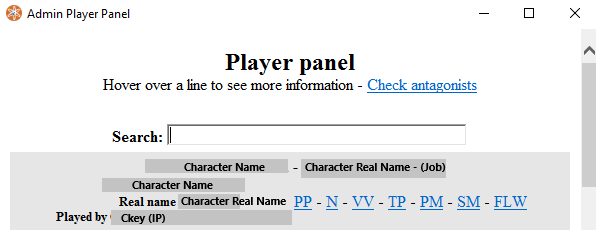
Accessed by typing the verb 'player-panel', or by clicking the relevant button in the Admin tab.
Contains a list of players currently in-game. This system is primarily useful for finding players. Notably, it has very similar commands to the Ahelp buttons. Two of these, PP and N, will be explained further here.
Individual Player Panel
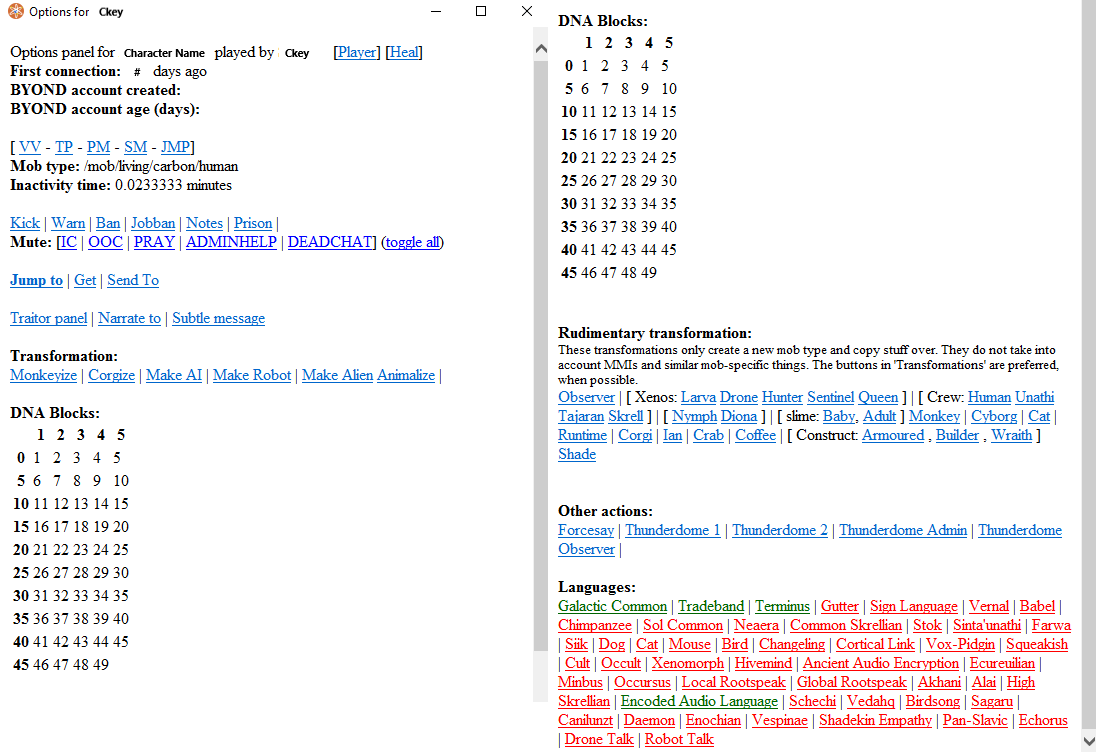
Accessed via the PP button found in certain Admin interfaces, such as ahelps, or by right clicking a mob and selecting 'Show Player Panel'.
Somewhat confusingly named, the Player Panel is the direct interaction panel for an individual player. It provides you with a lot of necessary information, such as Ckey and player age. It functions as a hub for most quick-interact buttons an Admin may need to use on a player. From this panel, a player's genomes may be checked, as can their known languages. An Admin may add or remove languages from a player through the table at the bottom of the page. Administrative actions will most easily be carried out through this panel as well, as the options to Aheal (Heal), check Notes, or Ban a player may all be accessed from this menu.
Notes Notes are vital to the duties of the server administration. There is a common perception that receiving a Note is a disciplinary or otherwise negative action. This is not entirely true. Administrators place notes on a player's account to record when incidents occurred, or if there is some special consideration that must be taken into account before disciplinary actions are taken. The Notes panel displays all notes placed on an account, as well as the time and date, and the administrator who placed the note. It is recommended that you add a note to a player whenever you have to Admin PM them, or otherwise counsel them.
View Variables
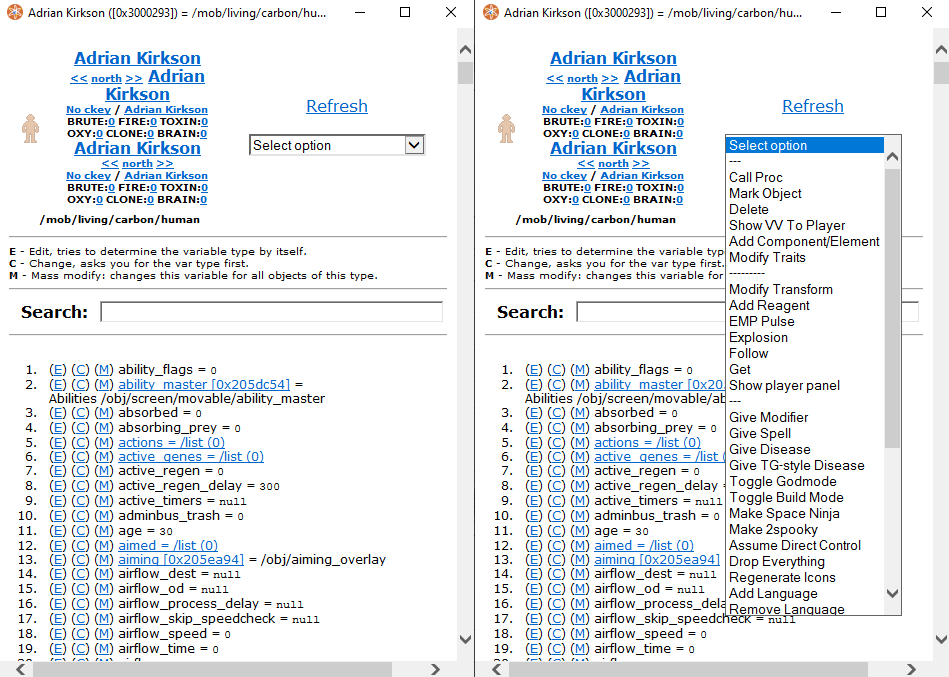
Accessed by right clicking an item and selecting 'View Variables', or through the VV button.
Variables dictate virtually everything in the game. This powerful command allows you to change core aspects of the subject item or mob. It is entirely possible to damage the entire game for the duration of the round - ex. deleting the blood reagent completely - if you make mistakes in this panel. Due to this, be sure you know what you're doing before you do it, and if you have any questions, make sure you ask someone who might know. The VV panel has a drop-down menu for some quick edit choices, and it also has an integrated search bar to help you find relevant variables.
Traitor panel
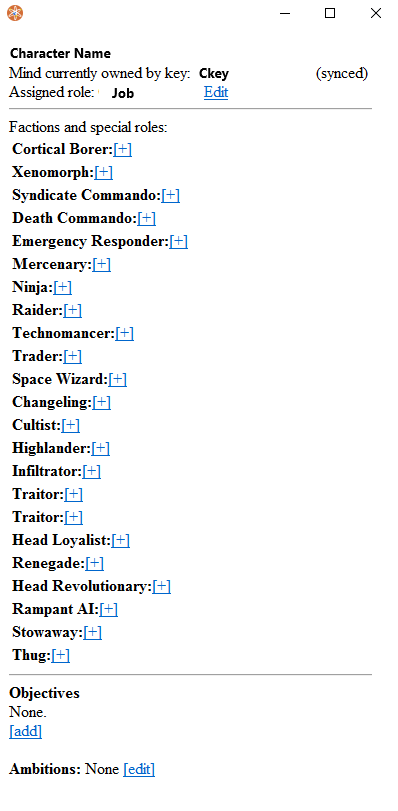
Accessed by right clicking a mob and selecting 'Show Traitor Panel'.
Contains the options to make someone an antagonist and specialize their role (objectives, equipment, memory, etc.).
Important verbs
These are the first verbs you should get to know. There are many more but these will always be important.
- asay - admin channel talk (OOC)
- dsay - dead channel talk (OOC)
- Aghost - makes you a ghost, but leaves your body intact. If you are currently aghosting, repeating the command will return you to your body.
- staffwho - check which admins are connected.
- deadmin - if you wish to play a round as a non-admin, use this. If needed, you can regain your powers with the re-admin verb.
- jump-to-mob/key/area/coordinate - makes you jump to the location. Does not make you a ghost before jumping!
- jump-to-turf - best used if you right click a turf to jump to it.
- secrets - shows the secrets panel as explained above.
- toggle-adminhelp-sound - plays a sound when an adminhelp arrives so you can tab out of the game.
- show/hide-deadchat - toggles whether you hear deadchat.
- show/hide-radio-chatter - toggles whether you hear the radio (useful when dealing with many adminhelps at once with a chatty radio - in other words often).
- show/hide-ghost-ears - toggles whether you hear all mobs as a ghost or just the ones in range.
